The Fraunhofer Vision Alliance, combining expertise from several Fraunhofer institutes including the Fraunhofer Institute for Physical Measurement Techniques IPM, presented three optical systems for inline quality assurance at the Control trade fair.
The instruments displayed in Stuttgart in May included: a holography system able to measure extremely accurately the 3D surface topography of a part while still in the machining tool; a measurement sphere containing 27 cameras that captures a 360° view of small components in freefall, with no occlusions; and an inline system using bright field and dark field illumination to detect surface particles.
Andreas Hofmann, business development manager at Fraunhofer IPM, said: ‘All these systems enable customers to inspect 100 per cent of their products. [Inspecting each part] gets more important [in automotive production], and this can be fulfilled with these optical measurement systems.’
Most projects Fraunhofer IPM undertakes are for the automotive sector. It installed a digital holography system called HoloTop on the production line of an automotive company in 2015, which has been making continuous surface topography measurements ever since.
HoloTop, and now the new system HoloPort, which Fraunhofer IPM demonstrated at Control, are based on an interferometric technique whereby the topography of rough surfaces can be calculated from interference patterns. Both use narrowband lasers to cover a measurement spectrum from sub-micrometre to millimetre range, and the systems are able to image at a precision of 100nm for single point reproducibility. At the same time, the technique is fast, capturing 100 million 3D points in a second. ‘It’s currently the fastest measurement system in this precision class,’ said Dr Alexander Bertz, group manager for geometrical inline measurement systems at Fraunhofer IPM.
HoloPort operates over a 20 x 20mm area. It doesn’t scan the surface, but uses a nine-megapixel camera to capture a 3D point cloud in a single shot. ‘It’s quite astonishing that you get this precision with an imaging system,’ Bertz added.
HoloPort is designed to measure automotive parts while they are being milled. ‘You can put the sensor in a tooling machine and directly inspect and measure the part you are tooling,’ Bertz said. It means the component doesn’t have to be taken out of the milling machine to be measured separately with coordinate measuring machines (CMMs) or other systems.
The long-term plan, explained Bertz, is to use the instrument to give feedback to the milling machine on whether it is milling in the correct areas, and how the tool is wearing down. ‘You can determine when you should change the tool, and you can tell the machine to change the geometry of the tooling because of wear in certain places,’ Bertz said. In addition, the machine can be instructed to correct for any errors in geometry detected during the process and re-tool. The system uses a GPU, as the key to the technique's success is processing the interferometric data quickly. ‘The algorithms are quite complicated, using a large amount of Fourier transforms, which is actually perfect for a GPU,’ said Bertz.
He feels the system would also be suitable for combining with a conventional CMM. ‘It’s still a bit heavy, but in the mid- or long-term you can imagine putting such a sensor on a CMM and then having a high-precision full field measuring coordinate machine, which would be faster than the currently available tactile CMMs.’ CMMs are precise, but are slow to make measurements.
Inspecting in freefall
The second system Fraunhofer IPM showed at Control is a sphere incorporating 27 cameras. Engineers on the factory floor would drop small components through the top of the system, triggering LED illumination and the cameras to capture the entire surface of the part while it is in freefall. The LEDs generate 20µs flashes to illuminate and freeze the sample. ‘This is quite an intuitive approach,’ said Bertz. ‘It’s astonishing how complex parts can be inspected in this way.’ The inspection system has no occlusions, which would normally be the case when handling the components.
Different types of fastener can be inspected, for example, all of which have different surface geometries. ‘If your product portfolio has many types of component, you don’t have to use a special handling system for each product. You can just throw them through the sphere,’ explained Hofmann. This is a benefit when producing parts in small batches, as they can all be dropped through the sphere. Inspection time is around one to two parts per second.

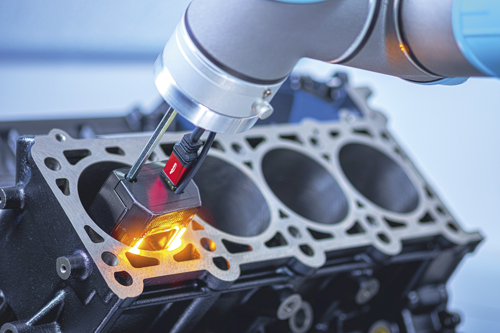
The system can detect surface particles in engine blocks on the production line. Credit: Fraunhofer IPM
The system takes 27 distinct 2D images and combines them into one surface texture pattern to find structural defects, like holes and scratches. In addition, it offers the possibility to add fluorescence analysis, which can be used to detect surface contamination with organic materials such as oils.
A similar – on the surface at least – measurement sphere has been built by Spanish firm Zero Gravity 3D, which spun out of the Instituto Tecnológico de Informática, in Valencia. This uses 16 cameras and many LED light sources to capture images of falling components, but that’s where the similarities end – Fraunhofer IPM’s 2D surface texture analysis for fast inspection is very different to Zero Gravity 3D’s system, which generates 3D data for comparison with CAD files to detect geometrical flaws.
Bertz said combining the images from the 27 cameras is the critical part of the system. ‘It’s a lot of data, 5 megapixels per camera,’ he said. ‘In the first shot you have a lot of data, but we combine it in such a way that you’re getting a complete surface texture representation of the object, which is a lot smaller than the original data. If you integrate the sphere in the production line, you would only store whether the part is good or not, and if it’s not good, then you’d store one area showing the defect.’
Particle detection
The third system is designed to detect particles on the surface of car parts, using both bright field and dark field illumination. The inline particle detector is able to detect scratches, holes or colour defects on the surface of parts, along with identifying particles on the surface using dark field illumination.
‘Quality assurance at the moment involves cleaning the part and then filtering the cleaning water to count the number of particles in the filter,’ said Hofmann. ‘With our system, you can detect the relevant surfaces of an object like a motor inline, and can detect the particles on these surfaces. You can also define if these particles are metal or organic.’ Metal particles on a metal surface are really difficult to detect using conventional industrial vision.
Each of the three systems presented at the Fraunhofer Vision Alliance stand at Control can be integrated into a production line for 100 per cent quality inspection, which Bertz said is becoming more important for automotive manufacturers. At the same time, making measurements inline gets rid of dedicated measurement rooms. Hofmann added that automated inspection is also important to document quality control, so that suppliers can prove to their customers that the parts meet quality assurance specifications. EO

